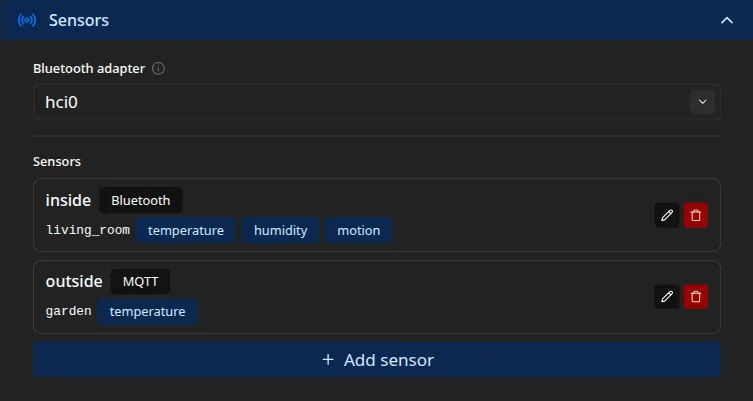
Sensors
Sensors feed the live readings on the frame: the inside and outside temperature, the humidity, and motion. Motion is also what lets the screen sleep when a room empties and wake when you return, and every reading is published to Home Assistant when the bridge is on. Manage them under Settings → Sensors. A fresh frame has none.
Roles and readings
Section titled “Roles and readings”Each sensor has a role and one or more kinds. The role groups its readings by place,
usually inside or outside. The kind is what it measures: temperature, humidity, or
motion.
On the frame, an inside sensor’s temperature shows as the inside reading and an outside sensor’s as the outside reading. See the kiosk display. An outside temperature sensor takes priority over weather, which fills in only when no sensor reading is current. A motion reading drives the idle screen-off described on Slideshow & display.
Each role-and-kind pair is unique. Two sensors cannot both supply the inside temperature, for example. The admin interface rejects the clash.
Sensor types
Section titled “Sensor types”A sensor draws from one of three sources.
Bluetooth (BLE) connects to a nearby device by its MAC address and reads its GATT
characteristics. It listens for notifications where the device offers them, the low-latency path
that suits motion, and polls on a timer as a fallback. For each characteristic you map its UUID
to a reading kind and a decoder that turns the raw bytes into a number. This uses the Pi’s
Bluetooth. Pick the adapter (usually hci0) at the top of the card, and set the device’s
address type, public or random, when you add it. Public is a manufacturer-assigned address.
Random is one the device generates itself, which is what many small sensors use. A BLE scanner
shows which a device uses, so you need not guess.
The frame connects to the device to read it, so a sensor that only broadcasts its values in advertisement packets, without accepting a connection, is not supported here. Bring those in over MQTT instead: a gateway that decodes them, such as Home Assistant’s Bluetooth integration or an ESPHome proxy, can republish the value for an MQTT sensor to read.
MQTT turns a topic you already publish into a reading, whether from Zigbee2MQTT, an Ecowitt gateway, Home Assistant, or anything else on your broker. It needs the MQTT broker set up first (see Home Assistant). You choose a parser for the payload, and for a topic that carries several values in one JSON message, you point a field path at the one you want. To read Home Assistant’s own entities, enable its MQTT Statestream integration so they appear on the broker.
Mock emits made-up readings on a timer, with no hardware. It is handy for trying the frame out before real sensors arrive.
Decoders
Section titled “Decoders”A decoder turns a raw value into the number shown on the frame. The same set is available to both sensor types. Bluetooth calls it the decoder, MQTT calls it the parser.
int16le_div100, a little-endian signed 16-bit integer divided by 100, so2345reads as23.45.uint16be_div10, a big-endian unsigned 16-bit integer divided by 10, so485reads as48.5.bool_nonzero, any non-zero byte becomes 1, for motion and other on-or-off readings.raw_floatandraw_int, for text that already holds a number, such as23.4or42.onoff_to_bool, which readsON,on,true, or1as 1 and anything else as 0.
The first three suit Bluetooth’s binary characteristics. The last three suit text MQTT payloads. If a device’s format matches none of them, republish it as a plain number through Home Assistant or another gateway, then read that with an MQTT sensor.
Adding a sensor
Section titled “Adding a sensor”Click Add sensor, then give it:
- an ID, a unique name for the sensor;
- a Role, such as
insideoroutside; - a Type, Bluetooth, MQTT, or Mock, which reveals the fields for that source.
Save with Add. Existing sensors appear in a list, each showing its role, type, and reading kinds. Edit or delete one from there.
When a reading does not appear
Section titled “When a reading does not appear”A sensor that cannot start, because the Bluetooth adapter is missing, a dongle is unplugged, or the broker is unreachable, is skipped rather than allowed to take the frame down, so the photos keep running. If a reading is missing, check the device, the role and kind, and, for Bluetooth, that the adapter is powered. The installer unblocks the Pi’s Bluetooth, and a BLE reading appears once the device connects.
Every sensor field is listed in the configuration reference.